In a perfect world, these will all be what you need them to be, but it’s possible that you will need to adjust some of them. Fortunately, you can learn how to change automatic font color in Word if the current setting isn’t what you need.
How to Change the Default Font Color in Word 2013
Our article continues below with additional information on how to change automatic font color in Word, including pictures of these steps. If you’ve been looking for a font that looks like handwriting, then our cursive fonts in Word article can show you a couple of different options to try out. New documents in Microsoft Word include a combination of settings that are defined by the Normal template. These default settings effectively determine what new documents will look like, so you will need to change these settings if you want a different setting for all future new documents. If you want to change the default font color in Word, then you will need to select a different color and set it as the new, automatic font color. Using a different font color for a document in Word 2013 is as simple as changing an option in the navigational ribbon. You can even change the font color for a large section of text in a document, or change the color of an entire document. But if you change the font color of nearly every document that you create, you might be looking for a way to permanently change the font color for future documents and save yourself some time. You can do this by changing the default font color for the Normal template in Word 2013. Your iPhone might occasionally send an iMessage as a text message if it runs into a problem with the iMessage service. Find out more about the sent as text message notification and what it could mean.
How to Switch to a Different Default Font Color in Word 2013 (Guide with Pictures)
The steps in this article will change the default font color settings for new documents that you create in Word 2013. Existing documents, such as ones that you created before you switched the default color, or documents sent to you by other people, will use the font color that is already set for that document.
Step 1: Open Microsoft Word 2013.
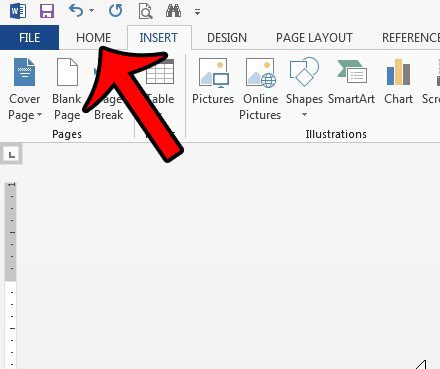
Step 2: Click the Home tab at the top of the window.
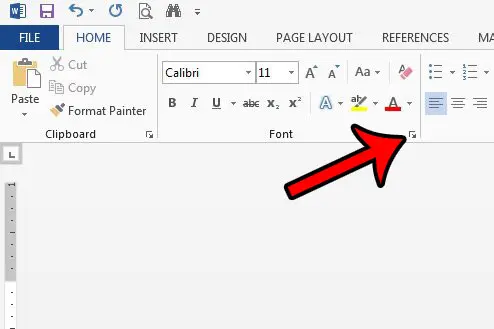
Step 3: Click the Font button at the bottom-right corner of the Font section of the ribbon.
This is a very small button, so it’s easy to miss. It opens a Font dialog box where you can make a number of different font changes to your document.
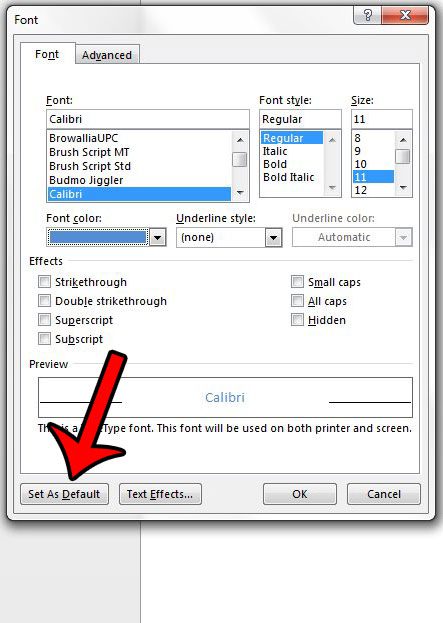
Step 4: Click the drop-down menu under Font color, then select the color that you would like to use by default.
You can click the More Colors option if you do not see the color that you want to use.
Step 5: Click the Set as Default button at the bottom-left corner of the window.
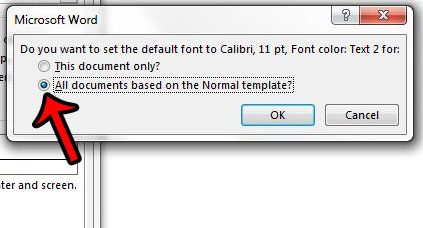
Step 6: Click the All documents based on the Normal template option, then click the OK button.
Now when you create a new document in Microsoft Word 2013, it will be using the color that you just selected by default. Hopefully, the steps above have provided you with the instructions that you needed when you wanted to know how to change automatic font color in Word 2013. If you want to change the default font in Word 2013, you can do that by following a very similar process. Click here to see how to switch the font in Word 2013 to something other than the Calibri font that it uses when you first install the program.
More Information on How to Change Automatic Font Color in Word 2013
The steps in our guide above are focused on adjusting the text color that is used automatically when you create a new document. This isn’t going to affect any existing documents that you have created, or any documents that are sent to you by another person. It also won’t affect any default settings for any template other than the Normal one. Check out this how to change color of table in Word article if you want a different border or background color for your table. While this article was performed using the Microsoft Word 2013 version of the application, it will also work in newer versions of Word, such as Word 2016. Many schools or organizations have specific settings that they require you to use, and the font color is usually one of those. Be sure that you switch back to the required color if you are editing a document with those types of requirements. You can change the font color for an entire document by clicking inside of the document, pressing Ctrl + A on your keyboard to select everything, then adjusting the font color option found on the Home tab. This only affects the font color for Microsoft Word documents. It won’t change the default font color for other Microsoft Office applications like Microsoft Excel or Microsoft Powerpoint.
Related Guides
After receiving his Bachelor’s and Master’s degrees in Computer Science he spent several years working in IT management for small businesses. However, he now works full time writing content online and creating websites. His main writing topics include iPhones, Microsoft Office, Google Apps, Android, and Photoshop, but he has also written about many other tech topics as well. Read his full bio here.
You may opt out at any time. Read our Privacy Policy


