While there are a lot of different applications that you can buy or use online, you might be looking fo something simple and free that is already on your computer. Microsoft Paint fills this role nicely and has the tools that you will need for most basic types of picture editing.
How to Change Pictures in Microsoft Paint
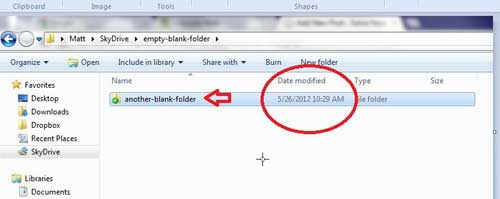
Our guide continues below with additional information on editing Microsoft Paint pictures, including pictures of these steps. As people use computers with more and more frequency and become more capable with them, they start to learn new tasks. This coincides with a level of comfort and excitement when you start to realize the full capabilities of your computer, as well as the surprising number of things that you can accomplish on your Windows 7 computer. If you were not aware, your Windows 7 computer includes an image editing and drawing program called Microsoft Paint. You can use this to draw images from scratch, or you can use it to edit existing images. This is particularly helpful if you need to show someone an image of your computer, called a screenshot, or if you need to edit a screenshot in Microsoft Paint. This is a great way to point out a specific part of the screenshot by either drawing an arrow or drawing a circle. Our resize image in Paint article can provide you with additional information on how to make your picture bigger or smaller using the tools in Microsoft Paint.
How to Use Microsoft Paint to Make Changes to an Image (Guide with Pictures)
Screenshots are helpful tools to have at your disposal because sometimes you just cannot accurately describe something to someone. It is also helpful when you have something displayed on your screen that someone else would not be able to recreate, and you want to share it with them. Many people struggle with the screenshot functionality because there is no confirmation that the screenshot has occurred when you take it. But in this tutorial you will learn not only how to take and save a screenshot, but also how to edit a screenshot in Microsoft Paint. Configure your screen so that the elements that you want to capture are visible. The screenshot function will only take an image of what you see on your screen right now. If you have a minimized window or a window that is behind another window, it will not be included in the screenshot.
Step 1: Press the PrintScr button at the top-right corner of your keyboard.
It will seem like nothing happened, but the screenshot has been saved to your computer’s clipboard.
Step 2: Click the Start button at the bottom-left corner of your screen, type “Paint” into the search field, then press Enter on your keyboard.
Step 3: Press Ctrl + V on your keyboard to paste the screenshot that you copied earlier.
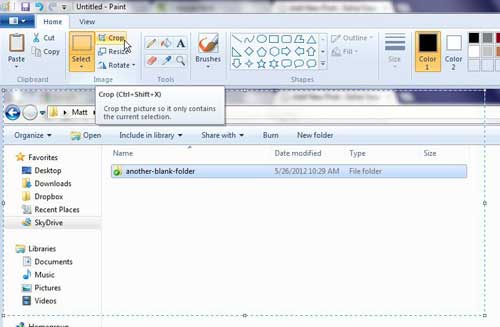
Step 4: Click the Crop button at the top of the window, then use the cursor to draw a square around the part of the image that you want to keep. Click the Crop button again to crop the image.
Note that you do not have to crop the image if you do not want to. Now that you know how to crop an image that you have added to Microsoft Paint you might want to make some other changes, too. We discuss several of those options in the section below.
More Information on Using Microsoft Paint to Edit Photos
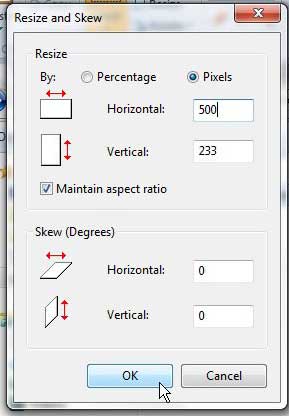
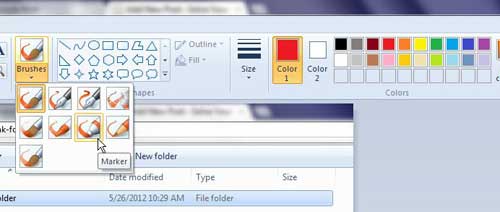
If you just need to make some basic changes to a picture that you have on your computer, the n you will find Paint to be ad adequate solution. We will show you some of the tools available to you in this image editing program below. If you want to resize the image, click the Resize button at the top of the window, change the values in the horizontal and vertical fields, then click the OK button. Use the Brushes tool to draw freehand shapes on your image. You can change the color and size of the brush by clicking a different color in the Colors section of the menu and clicking the drop-down menu under the Brushes button, respectively. You can also use the Shapes tool to draw more precise shapes on your image, such as circles or arrows. While the program does not have a lot of advanced editing features, it is ideally suited for situations like this, where you are just making some basic changes to screenshots that you have taken from your computer. If you find that you need additional options for editing your images, you can always upgrade to more advanced tools like Photoshop or GIMP.
Additional Sources
After receiving his Bachelor’s and Master’s degrees in Computer Science he spent several years working in IT management for small businesses. However, he now works full time writing content online and creating websites. His main writing topics include iPhones, Microsoft Office, Google Apps, Android, and Photoshop, but he has also written about many other tech topics as well. Read his full bio here.
You may opt out at any time. Read our Privacy Policy


